まずカスタムSgueで開く方は簡単で、UIStoryboardSegueのサブクラスを作ってperformメソッドを実装するだけ。
以下がコードです。
Unwind segue(戻る)用も同じ処理でReverseアニメーションさせてるのでisReverseを追加してます。
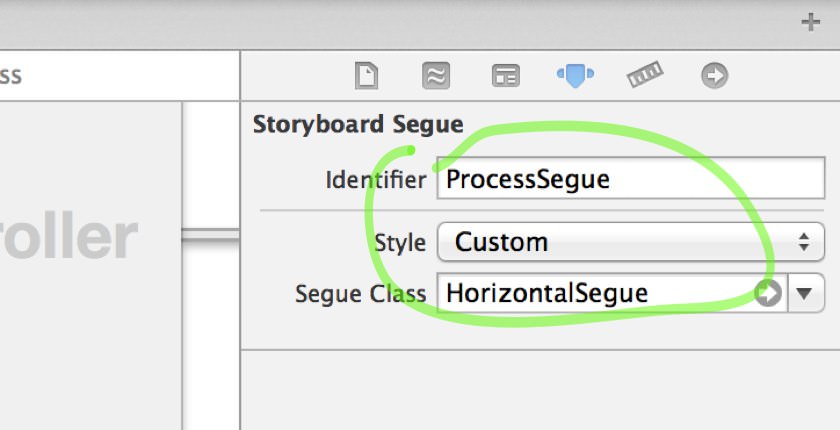
これを上記の画像のように設定して終わり。
@implementation HorizontalSegue
@synthesize isReverse;
-(id)initWithIdentifier:(NSString *)identifier source:(UIViewController *)source destination:(UIViewController *)destination
{
 isReverse = NO;
 return [super initWithIdentifier:identifier source:source destination:destination];
}
-(void)perform{
 UIViewController *sourceViewController = (UIViewController *) self.sourceViewController;
 UIViewController *destinationViewController = (UIViewController *) self.destinationViewController;
 [sourceViewController.view addSubview:destinationViewController.view];
 [destinationViewController.view setFrame:sourceViewController.view.window.frame];
 [destinationViewController.view setTransform:CGAffineTransformMakeTranslation(
 isReverse ? -sourceViewController.view.frame.size.width:sourceViewController.view.frame.size.width, 0)];
 [destinationViewController.view setAlpha:1.0];
 [UIView animateWithDuration:0.45
 delay:0.0
 options:UIViewAnimationOptionTransitionNone
 animations:^{
 [destinationViewController.view setTransform:CGAffineTransformMakeTranslation(0, 0)];
 [destinationViewController.view setAlpha:1.0];
 }
 completion:^(BOOL finished){
 if (!isReverse) {
 [destinationViewController.view removeFromSuperview];
 [sourceViewController presentViewController:destinationViewController animated:NO completion:nil];
 }
 else {
 [sourceViewController dismissViewControllerAnimated:NO completion:nil];
 }
 }];
}
@end
戻る方はちょっと面倒で昨日填まったところです。
まずは、送り元のViewControllerに以下のメソッドを定義します。
メソッド名は適当で構いませんが型は合わせて下さい。
ここが、戻るときにSegueでと連携させるメソッドになります。
つまり、閉じるときに呼ばれるメソッドですね。
// unwind segueの定義
- (IBAction)exitToMasterView:(UIStoryboardSegue *)segue
{
}
もう1つ、同じく送り元のViewControllerで以下のメソッドをOverrideします。
これが戻るときにReverseアニメーションするための設定になります。
// カスタムセグエの戻り処理
- (UIStoryboardSegue*)segueForUnwindingToViewController:(UIViewController *)toViewController fromViewController:(UIViewController *)fromViewController identifier:(NSString *)identifier
{
 if ([identifier isEqualToString:@"DoneProcessSegue"] || [identifier isEqualToString:@"CancelProcessSegue"]) {
 // 右スライドの戻り
 HorizontalSegue* segue = [[HorizontalSegue alloc] initWithIdentifier:identifier source:fromViewController destination:toViewController];
 segue.isReverse = YES;
 return segue;
 }
 return [super segueForUnwindingToViewController:toViewController fromViewController:fromViewController identifier:identifier];
}

storyboardから、カスタムSegueで開かれる(送り先)ViewControllerの「Exit」をCtrl+Clickでポップアップを表示します。
上の画像のように、先に登録した閉じる時に呼ばれるメソッド(exitToMasterView)と連携するオブジェクトを紐付けます。
ボタンに直接紐付けてもいいのですが、それだと閉じるを制御できなくなるので(キャンセルのダイアログを挟みたいとか)Manualで制御するため自分自身に紐つけしておきます。
あとは、これで作ったUnwind segueのidentifyに識別用の名前を付けて設定は完了。
後は、閉じたいときに(例えばボタンタップで)以下のように呼び出すと戻るSegueのアニメーションで元のページに戻ります。
[self performSegueWithIdentifier:@"DoneProcessSegue" sender:self];
なかなかまとまった情報がなくて、あちこちから拾い集めてきた情報を寄せ集めた結果ですけどね(笑)
ちなみに、これはViewControllerからViewControllerの場合なので、NavigationControllerを使う場合はもう一ひねり必要です。
送る方はこのまで大丈夫ですが、戻る方の実装が変わります。
Comments